

Hello DIY lover! Today, at DIY BEAUTY, we are here with a new and exciting DIY craft known as DIY Minecraft cat Perler beads. Perler beads are available in different colors so that you can easily design anything you want. Many people like to craft various animals and things with these beads. And when it comes to Minecraft, everyone knows it and loves to play it! So, we are going to help you learn a complete method of DIY Minecraft cat Perler beads ideas.

Cat Perler Beads – Each Cat With A Different Pose
Did you know that designing two cats with Perler beads is not a tough job? If yes, then it is good! If not, then you may need to read this post till the end. We are not just going to design a single but two cats. Each cat Perler beads will have a different pose as one would be in a regular standing position while the other one will be sitting on the floor.
However, everyone knows that cats have different breeds so it is up to you which breed of cat you would like to make. We like to make something unique, so we are going to choose an orange color for our cats. The reason to choose orange is that it is quite vibrant and eye-catching. Nevertheless, you can pick your favorite color for your cats!

Step 1 – Take Off The Beads From Pegboard
Firstly, you have to make use of a method through which you can easily get off the beads of the pegboard. We will use a masking tape method as it is quite convenient. You just need to do iron and you are good to go. You need to arrange your painters’ tape in a rectangular form so that you can easily craft your cats.

Now, you have to grab a parchment paper or else you can make use of an ironing paper to start ironing. You have to preheat your iron on a medium scale. Start ironing and keep doing until the beads start looking darker through the paper. If the cat Perler beads become darker than it means they are fused together.

However, keep in mind that you do not have to iron it for long. Otherwise, your Perler beads will start looking flat. Not just that, you will not be able to click them together. Moreover, you have to iron on both sides and do it for the same time period. When everything is fused properly from both sides then it means you can stop ironing.

Step 2 – Cool Down The Beads
It is time to cool down everything for perfect use. But you must be wondering how to do that? Well, it is quite simple. You just have to put a book on it so that it can easily cool down.
The best thing about masking tape is that you can easily change the position of the beads according to your needs. We are going to curl the tail of the Minecraft cat so we will position the beads in curved shape. Remember, it would not be possible to position the tail in a curved shape if we were ironing the beads directly on the pegboard.
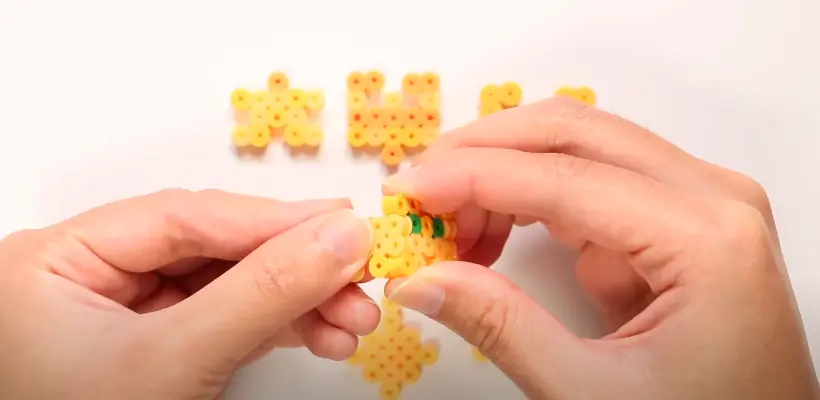
Moreover, you have to paint the white part of the cat’s eyes instead of using white beads. Otherwise, it will not look like a Minecraft cat. There should be no white on the side of the head of the cat. White part should only be present on the front side of the face.
Step 3 – Start Making Cat Perler Beads
It is time to assemble the body of the cat. You need to glue down two pieces together to make the legs. Do not try to make a slot for the third connection. In this way, you will be able to see the second method for the legs of the other cat. To support the legs, we are going to use some acrylic rods. In case you do not have acrylic rods at home then on issue! You can even use toothpicks!
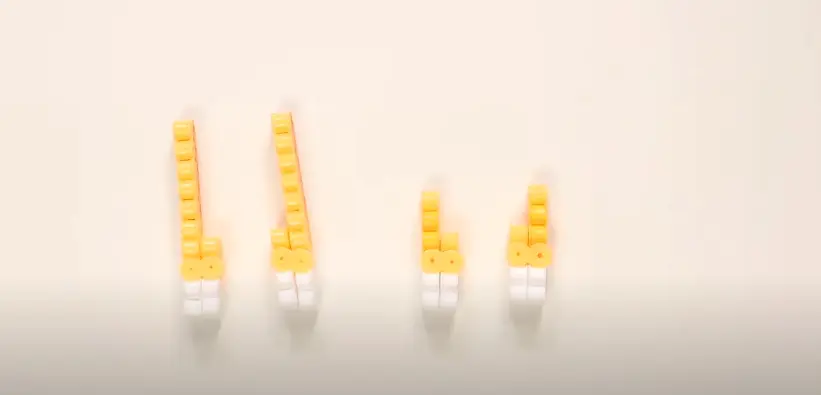
When the legs are settled then you should start attaching the head of the cat. Click it back in and so the head will be able to rotate. Moreover, ensure that the front legs are completely secure, and the back legs could go around.
Step 4 – Finishing
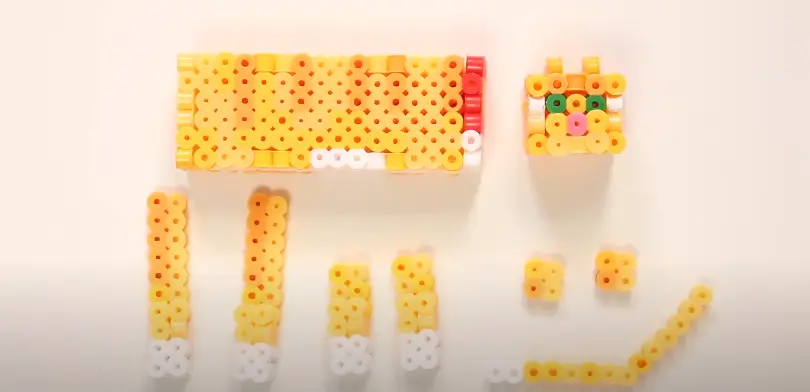
After that, you have to glue down the shoulder blades if possible. In case you are facing any problem then you should not go for the shoulder blades. At the end, you have to attach the tail of the cat Perler beads. You can use paper clips to attach the tail but stick it tightly through the beads. In this way, the tail will be able to move up and down nicely.
Congratulations! Your very own Minecraft orange cat Perler beads are ready!
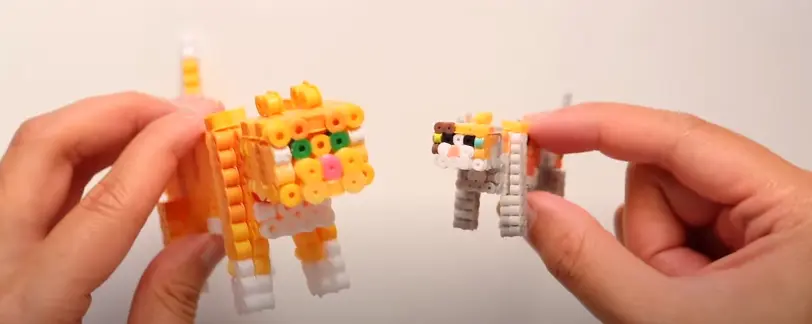
Follow the same method for the other cat and you are ready to use them as a perfect decoration piece! Gift them to your loved ones on their birthday or else you can put them in your drawing room. Add as many things as you want for the finishing touch!
Final Words
From the above-mentioned procedure, any of you can start crafting DIY cat Perler beads. This entire project is not going to take your entire day but only a few hours. However, grab the required materials and place them in front of you to save your time. Moreover, this DIY cat Perler beads project is not costly at all. We have explained the design of two cats, but you can make as many as you want! Furthermore, you can make cats of any breed, color and size. These masterpieces are perfect to use as a decoration item in your living space. So, try making these cats from Perler beads now!
You May Also Like:
← 2 DIY Minecraft Perler Beads Ideas
→ Disco Ball Decorations For Holiday Gatherings