

Welcome DIY Beauty fans! Do you know that Minecraft is one of the popular games because it has a different interface? Moreover, it is known as a sandbox game and so the graphical representation actually grabs the attention of many. If you are also fond of this game, then you must try out Minecraft perler beads projects. These Minecraft projects are simple for all those individuals who have ever assembled a jigsaw puzzle. In case you have not done it before then check out 2 DIY Minecraft perler beads ideas now!
DIY Minecraft Perler Beads Armor
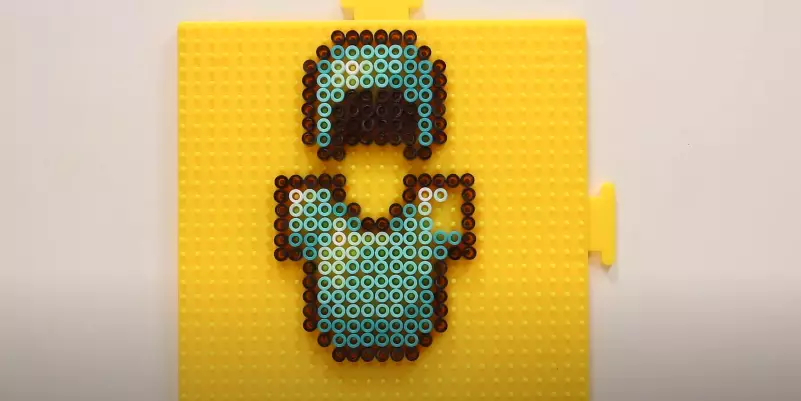
If you want to make the diamond armor, then it is important for you to gather the perler beads in the relevant shades. However, you first need to make the outlines of the sprites. After that, you have to fill them up with different shades. It is better to complete the diamond helmet first and then go for the diamond chest plate.
Nevertheless, you have to use a masking tape method for ironing the perler beads. Let me clear this for you that this method is quite easy to perform. Moreover, you can easily take off the perler beads without any kind of issue.
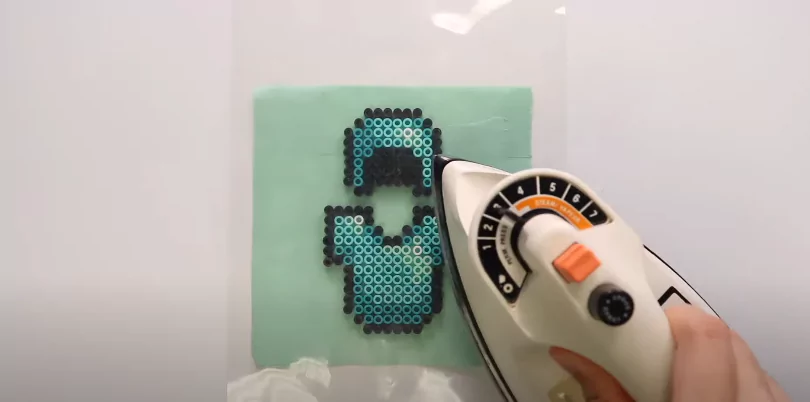
Once the perler beads are taken off then you have to flip them on the board. Diamond armor is definitely beautiful, and we are going to use iron film to give it a gleamy look. Keep in mind that you have to put the iron on a medium setting. If you keep it on a high setting, then the perler beads will be destroyed.

You have to iron the perler beads from one side and then the other. It is time to put a heavy book on the top so that the perler beads stay flat. If you will not follow this step, then you may face issues while making your Minecraft perler beads armor.

When the upper section is complete, you have to go for the diamond leggings. You have to repeat the same process above for the diamond leggings and shoes. Put all perler beads to create the leggings and shoes. After that, you have to iron them on the paper and then peel them off. In this way, you will get your complete diamond armor.

DIY Minecraft Pumpkin Perler Beads
Everybody is fond of pumpkins mostly because of Halloween. Do you know that you can make DIY Minecraft pumpkins from perler beads? This DIY Minecraft perler beads project will surprise you definitely.
First of all, you have to get the relevant shades for your pumpkins. After that, you have to get some translucent orange color beads. We will put light inside each pumpkin so that it can light up the space a bit. We will make faces of jack-o’-lanterns.

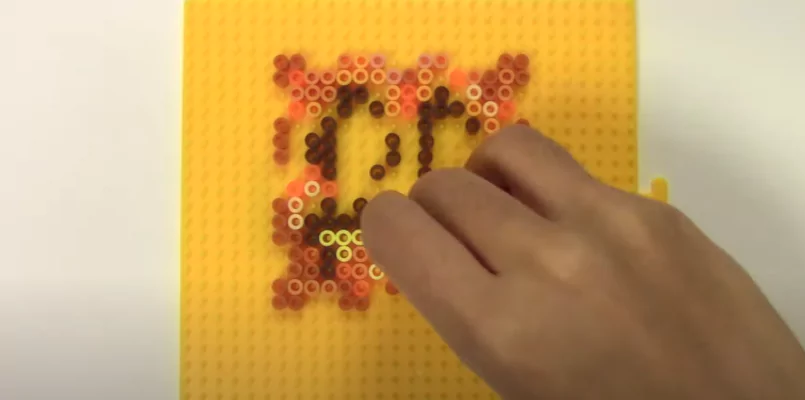
You have to start with the top of the pumpkin with the stalk. It will be thick, so you need to set the beads in different directions. For the bottom piece, we will make use of the translucent beads to fill the entire space. From the upper section, you have to copy the exact design but please take away the stem and create a butt hole for your pumpkin.

When the shape is complete then you have to go for the iron masking tape method. Put the masking tape on the Minecraft perler beads and then iron them properly. Keep the setting of iron to the medium. When one side completely becomes fused then you should go for the other one. Nevertheless, it is imperative for you to take off the masking tape carefully.

When your perler beads are done on both sides then you have to put a heavy book or copy to let them cool. Remember, you have to make a total of 6 sides for the pumpkin. Repeat the same procedure for each side and then you have to assemble them properly.

The difficult step was choosing the right shades for your project. Once it is complete then the rest of the steps are not difficult to follow. You need to get a small LED light to put in this pumpkin. When you are assembling the sides then you have to set the LED light for nighttime. After these steps, you will get your favorite DIY Minecraft pumpkin perler beads.

Read the information above and make a baby pumpkin with the beads. However, you have to choose mini perler beads this time for your baby pumpkin. Be more careful when you are assembling the mini beads as they are quite fragile. For the baby pumpkin, you have to make use of a small tea-light candle. This candle is not real as it is completely battery-powered.

Once done, put your Minecraft pumpkins on any table in your room at night and turn off the light! They will lighten up your space a bit as well as will look more beautiful.

Final Words
In conclusion, Minecraft perler beads are just a piece of cake for everybody! People love the sandbox game idea so why don’t you make different Minecraft items with the perler beads? If you have no idea how to make Minecraft items from perler beads, then our above-mentioned ideas are something that you are looking for! You can also gift these perler beads Minecraft projects to your loved ones. Moreover, you can create as many Minecraft items as you like with the perler beads. These small perler beads are available at affordable rates over the web so you can order them. Or else, you can purchase them from any of your nearest stores without breaking the bank! But please do try any of these Minecraft bead projects at home for once!
You May Also Like:
← 3 Amazing DIY Dollhouse Ideas For Your Children
→ 5 DIY Art Deco Style Ideas For Your Home