
DIY Beauty is honored to have you here! Today, we are going to talk about how to create a DIY reusable vacuum bag. We understand that buying a vacuum bag again and again can be quite heavy on your pocket. For that reason, you need to cut out this expense from your budget by creating your very own reusable bag at home. Just follow this complete step-by-step guide to create this DIY vacuum bag project at home easily.
How To Make A DIY Reusable Vacuum Bag?
Whether you have an old or new vacuum model, you have to make use of vacuum bags. However, disposing of these bags is nothing but extra waste. Also, keep buying them will maximize your budget unnecessarily. So, it is better to make a DIY reusable vacuum bag at home as it will not just save your money but waste as well.

Materials Required
- Thread
- Vacuum bag
- Cardboard
- Crafting knife
- Zipper
- Loop tape
- Ruler
- Nylon fabric
- Adhesive hook
- Sewing machine/needle
- Scissors
Note: You have to create this DIY reusable bag by looking at the vacuum bag you were using before.
Step 1
First of all, you have to measure the size of the vacuum bag from sides, back and front. After that, you have to take the nylon fabric and start cutting it down into 4 pieces. However, it is important to cut the nylon fabric pieces according to the measurements you have taken before.
Step 2
When you get the pieces of nylon fabric then you have to sew the edges with the help of a sewing machine or a needle. Moreover, you have to stitch it in zigzag form so that the bag could easily stretch up. Make sure to leave one open end so that you can empty it later from this open hole. However, it is time to hide the seams by just turning the bag inside out.
Step 3
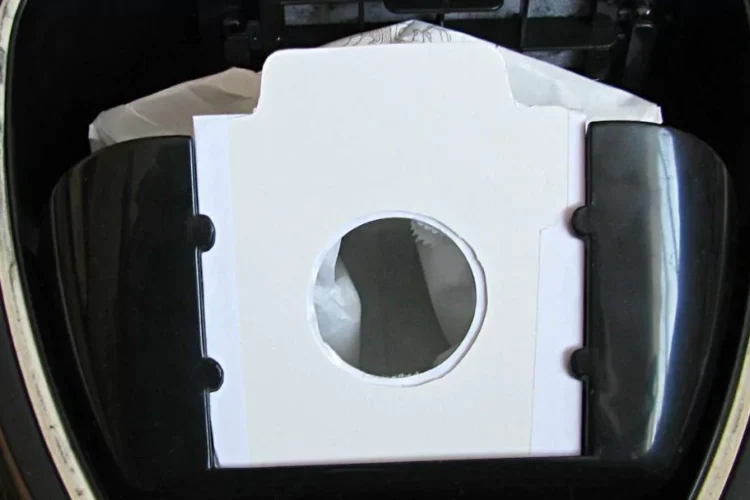
Now, you have to grab the cardboard piece and trace down the intake hole of the old vacuum bag. After that, you need to cut the cardboard according to this measurement with the help of a crafting knife.
Step 4
When you get the cardboard in desired measurement then you need to place the intake hole onto the nylon fabric vacuum bag. Remember, you need to use your old vacuum bag as a model. In this way, you can easily determine the hole’s place for your DIY reusable bag.
Step 5
Grab loop tape as well as adhesive hook to attach the nylon bag and hole. You have to perform this step properly as it is quite delicate to attach the intake hole with the bag. If you will not do it properly then your DIY reusable vacuum bag will not work for your vacuum cleaner.
Step 6
Get the cardboard piece that you have cut before and now slide it down into the DIY vacuum bag. Make sure that the cardboard piece is under the intake hole. Furthermore, you have to cut an X into the bag through the intake hole. We make this X to sew the zipper on the open end of the reusable vacuum bag. However, you have to use a zigzag stitch, not a straight one.
Step 7
It is time to put your DIY reusable bag into your vacuum cleaner. Make sure to keep the panel of the vacuum cleaner open so that you can expose the bag easily. Start your vacuum cleaner now to clean up your mess. However, you have to observe that the air should not escape from it. If it happens, your bag is not ready yet. If it is not escaping, then congratulations your DIY reusable vacuum bag is ready!
Some Important Points To Remember
Whether you are going to make or have already made a DIY reusable bag then you should check out these points. Your bag should be able to catch dust and hold it well. If it does not do it then you have to check out that flaw and fix it up right away.
On the other hand, you have to connect the nylon fabric properly as there should be no air leaks. This will stop dirt and dust from entering into your vacuum cleaner. Moreover, it will stop too much dust and dirt from being blown out again. Thus, it works like the hoover cleaner’s first filter.
Measurements play an important role in creating your very own DIY reusable vacuum bag. You have to measure the interior of your vacuum cleaner and its bag. After that, you have to design your DIY bag according to it.
Nevertheless, keep in mind that a small reusable vacuum bag can easily flap up. Moreover, it can cause any damage or leakage into your vacuum cleaner. So, you have to be quite conscious while measuring dimensions.
Final Words
In conclusion, it will be easy for you to understand that making a DIY vacuum bag is not a hard task. However, you must keep in mind the main points while designing your reusable bag. Make sure that your bag is made up of sturdy material and can easily fit into your vacuum cleaner. In this way, it will neither tear down nor damage your vacuum cleaner. Moreover, you can make a DIY reusable vacuum bag in just one hour. The entire process is super easy, and you can make it at home without breaking the bank.
You May Also Like:
← DIY Noise-maker Craft For New Year’s Eve
→ Cry Baby Noodles Recipe