

DIY Beauty welcomes you all! Crafting fairy wings is a delightful activity, whether for a costume party, a photo shoot or just to add a touch of fantasy to your daily life. DIY Fairy wings can be created in a variety of ways with just a few simple crafting materials and a little imagination. We are going to explain how you can make your very own fairy wings using cardboard, coat hangers, or cellophane. The DIY procedure is quite simple so every person can follow it with ease.
Materials Required For DIY Fairy Wing
Let’s grab the necessary supplies for this enchanting project before we set out on this magical adventure.
- Tulle or you can use pantyhose
- Crafting glue
- Thin wire
- Scissors
- Paints
- Brushes
- Glitter
- Feathers
- Gems
- Rhinestones
First of all, you have to start shaping coat hangers into ovals. After that, you have to cover them with mesh tights or stockings. In this way, you will create transparent fairy wings.
Furthermore, you have to cut down a piece of cardboard into the shape of butterfly wings. When it’s done properly then you have to start painting it in your favorite shades. Moreover, you can add ribbon straps of any shade.
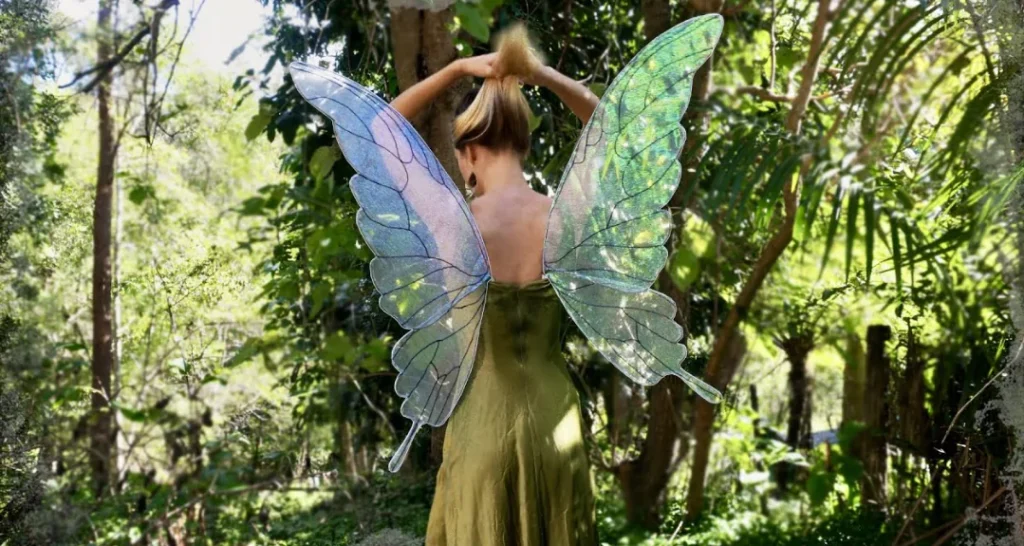
There are some people who want to create these DIY fairy wings for their children. If you are one of them then you have to make fairy wings resembling their favorite cartoon characters. However, you have to create realistic fairy wings by ironing cellophane properly onto the substantial wire frame. These wings will be perfect for cosplay or theatrical productions.
How to Make DIY Fairy Wings With Cellophane?
The method to make DIY fairy wings with the cellophane is pretty easy. All you have to do is to follow the steps one-by-one after gathering the above-mentioned materials.

Step 1
Make a poster-sized drawing of your DIY fairy wing. You have to create a rough design first, then fill it up with veins and swirly forms. However, you have to make sure that the veins or swirls are connected to the bottom corner of the wings properly.
In case you want your wings to be symmetrical, you only need to sketch one wing form. Moreover, this will serve as your pattern for bending the wire. This particular design of DIY fairy wing is intended to be used with a corset. Or else, you can use it with any other form-fitting bodice garment.
Step 2
You have to bend the heavy-duty wire to match the shape of your wing. Now, it is time to top your poster material with some heavy-duty 50–55 Lb wire. Keep in mind that you have to shape it to resemble the outline of your wing. Moreover, you must leave a lengthy stem that is the length of your hand protruding from the wing’s bottom corner. After that, you have to use wire cutters to remove any extra wire.
If necessary, tape the outline together with some foil. In case you want it to be strong enough then you have to choose strong wire. You can use a wire of around 50 to 55 pounds. Otherwise, your DIY fairy wings will misshape quickly with the slightest pressure.

Step 3
Now, you need to use wire gauges between 24 and 28. You also have to add the inside forms. In this way, you can use any size of wire for this stage. However, keep in mind that a thinner wire will be less noticeable. Still, you have to use the same method you used for the outline.
You need to bend the wire to match your sketch, then use wire cutters to cut it. You have to use more foil tape to affix the wire ends to the outline.
Furthermore, bend the skinny wire to make it look like the pattern of butterfly wings. It must be going in between the thicker wire. Make the wire into a twisty shape, then connect it to the inside part of a wing for a cool cartoon-style design.
For a fantasy cartoon design, twist the wire into a swirl and affix it to the inner base of a wing. You have to use a set of needle-tip pliers to help you form the thinner wire into delicate patterns and motifs.
Step 4
After applying adhesive spray on the cellophane roll, you have to place the wing on top. Roll out sufficient cellophane to completely encase the wing. After that, you have to place the wing on top of the cellophane after liberally applying spray glue to it.
Pick a cellophane color that looks nice with your fairy’s look. If you want a fairy-like Tinkerbell or The Blue Fairy, go for iridescent cellophane. It will make the wings look completely magical. However, you have to prevent the cellophane from clinging to you. Thus, you have to wear gloves.
Step 5
Cut the cellophane by folding it back over the wing. You have to make a border around the wing by rolling the remaining cellophane back over it until it is completely covered.
Furthermore, you need to make sure to smooth the cellophane down between the inner forms and around the outline as you apply pressure to it with your fingers.
The wing should now be cut out, leaving a border of 1 inches or 2.5 cm around it. You need extra crafting materials or books. To make it look even more dazzling, you can add some shiny, colorful glitter between the transparent plastic wraps.
Step 6
Dry each wing individually on a pile of books. On a flat area, place the cellophane-wrapped wing and pile some large books or boxes on top of it. The plastic wrap will become flat against the wing as it dries in this way. Now, you have to attach the cellophane to your other fairy.
Step 7
Iron the DIY fairy wings on a low heat setting while covering them with a towel. A fresh white towel should be placed on top of your wings. Place a dry iron on the towel, press it down, and slide it from one side of the wing to the other.
Don’t be concerned if you hear the sound of crinkling. The plastic wrap will be shrinking when it gets hot and wraps tightly around the wire. The cellophane and bare wire are kept away from the iron by the cloth.
Step 8
Cellophane surplus should be cut off, but a tiny seam should remain around the outline wire. Remove any extra material after the cellophane is sealed and cold to the touch. To prevent the cellophane from separating, don’t cut it down to the wire. Moreover, you have to leave a minimum border of 18 to 14 inches of cellophane all the way around your DIY fairy wings.
Step 9
To make the wings even more secure, attach them to a U-shaped wire. Cut a piece of wire weighing 50–55 lb into a thin U-shape that is 2–3 fingers broad and only a little taller than your hand. The stem of each wing should line up with a side of the U. To secure the U-shaped wire to the wings, wrap foil tape around it beginning at one end and continuing to the other.

Step 10
A corset or fitted dress’s back should be inserted over the DIY fairy wings. Slide the U-shaped harness down your back while wearing a strapless dress or corset. The wings will be secured to your back by the harness, giving the appearance that they are emerging from your shoulder blades.
If you decide against a U-harness, create small pockets in your fairy costume that you can tuck the stems of your wings into.
Final Words
In conclusion, you can design your very own DIY fairy wings at home by using affordable supplies. We have explained everything in detail so that any novice DIY can create his/her own fairy wings at home. You can design these wings in any color or pattern that suits your needs. Also, you can create these fairy wings for your little princess for any occasion by just following simple instructions. If you have any questions regarding this DIY wings project, do let us know!
You May Also Like:
← DIY Grave Decoration Ideas
→ Bookmark Ideas – Everything You Need To Know